Toilettes à vermicompostage
Vermicomposting toilet
Un simple, éprouvé, approche low-tech et open source pour une élimination écologique des déchets humains.
Design and construction
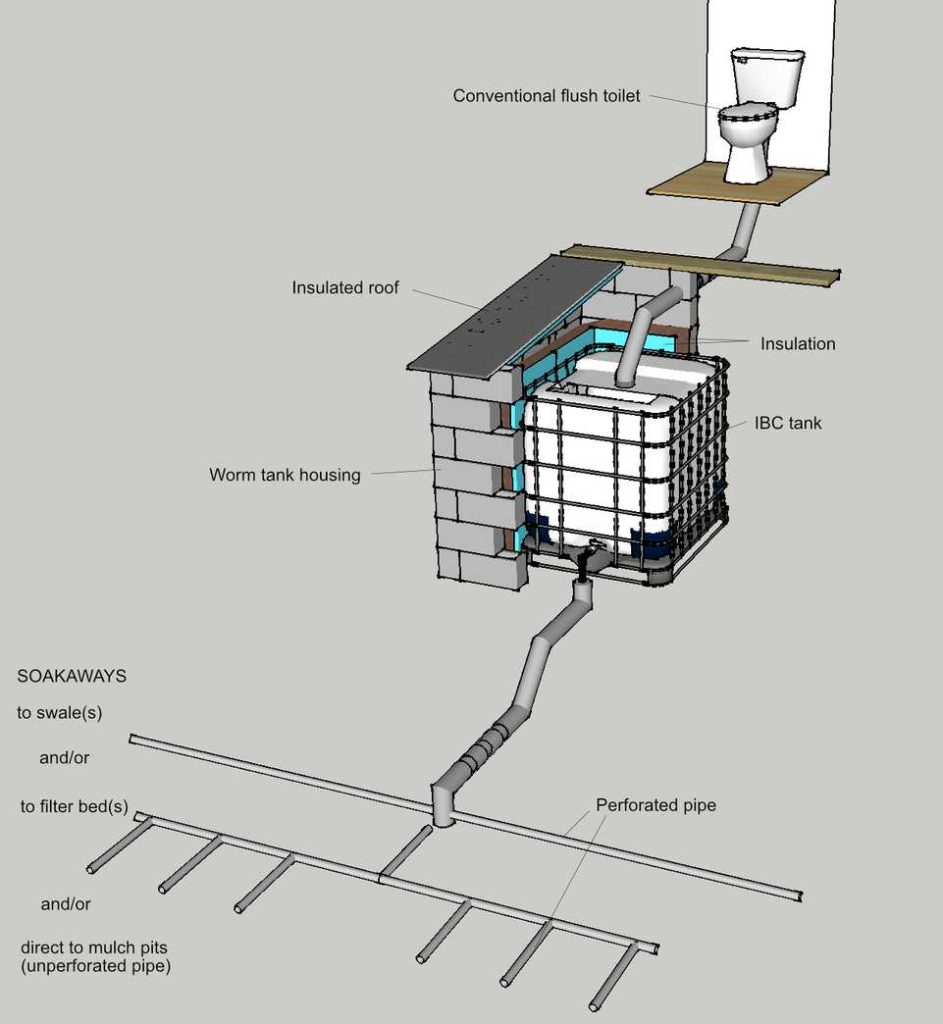
The design and construction of this vermicomposting toilet system is very simple. Il ne nécessite aucun apport d'énergie externe ni aucune machinerie pour traiter les eaux usées.. There are two main parts to the system (apart from the flush toilet): an insulated tank which houses the worms with their associated ecosystem, and a ‘greenfilter’ or soakaway area to allow the vermifiltered water to be cleaned further and returned to the environment. This simplicity allows for a lot of flexibility in how the system is implemented to adapt to individual sites.
Siting the vermicomposting toilet system
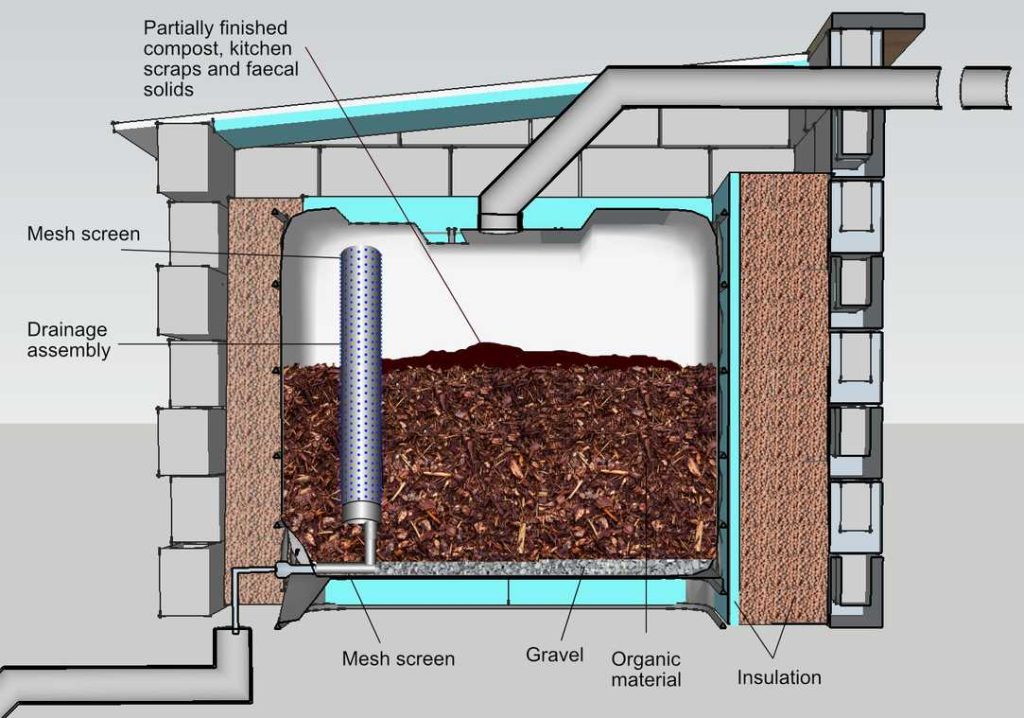
The vermicomposting toilet system revolves around biologically active aerobic processing of sewage. This applies to both the worm tank. where most of the cleaning takes place, and the ‘greenfilter’ or soakaway section of the system. To remain aerobic and biologically active, the ‘greenfilter’ or soakaway needs to be kept within the topmost 0.5m of soil where worms and aerobic soil biota thrive. Hence the siting of the ‘greenfilter’/soakaway determines the system layout.
At its simplest, the system is gravity-fed, so it’s best suited to sloping sites or sites where the waste pipe outlet from the flush toilet is half the height of the tank (0.5m) or more above ground level.
Siting the tank in a basement is possible, drainage possibilities permitting, as there’s no odour from the system when it’s working properly.
On flatter sites, the tank can be sunk up to half a metre into the ground without compromising the proper functioning of the system, but any more and the drainage from the tank starts to get too deep into the soil. Don’t forget to allow for the minimum drain slope (see below) in the piping between tank and ‘greenfilter’ beds/trenches/mulch pits when working out how far down you can sink the tank.
Can I bury the worm tank?
Burying the tank is conceivable, but in most contexts not advisable for the following reasons …
- IBC tanks weren’t built to be buried so would need a strong containing structure.
- A buried tank can create problems with drainage unless the vermifiltered water can be piped away to surface layers downslope.
- Maintenance and access for refilling is more difficult.
- Adequate air circulation could be an issue without supplemental ventilation.
- There may be problems if the water table rises to within reach of the tank during wet periods, as the tank is lighter than water and will float.
Installing an underground collecting vessel and pump for the vermifiltered water is possible, but risky as pumps often break down. High tech proprietary units with integrated drain water collection which were designed and engineered for burial and installed in Australia and New Zealand have experienced problems.
The vermicomposting toilet worm tank
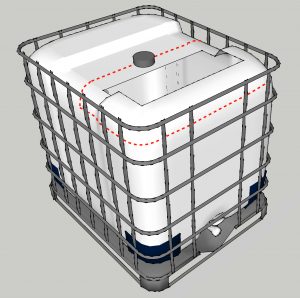
The worm tank is made from a 1m3 Intermediate Bulk Container (IBC) tote or pallet tank. These tanks make ideal containers with their central access hole at the top and a drain outlet at the base. IBC tanks can be easily sourced second hand in most countries, but since they’re used for bulk transport of all manner of liquids, be sure to acquire one that’s food grade and has only been used to transport non-toxic liquids. Sometimes you’ll find a cup and fork food grade symbol embossed in the plastic of the tank.
Access
You will need to cut an access hatch in the top of the tank for inspection and to allow periodic additions of the organic material the system needs to function.
For ease of access and loading it’s best not to make this hatch too small. Also, if you ever have a problem, you might need to get into the tank to fix it, so make sure it’s large enough and that you have enough space above it for someone to get in. Keep in mind that the pipework from your toilet will need to be fixed into the central access hole at the top, so don’t cut the top of the tank right off.
Air needs to circulate within and around the tank to keep the system aerobic. There’s no need for additional ventilation, but don’t make the tank or the tank container airtight. There are no odours to worry about with this system if it’s running as it should be.
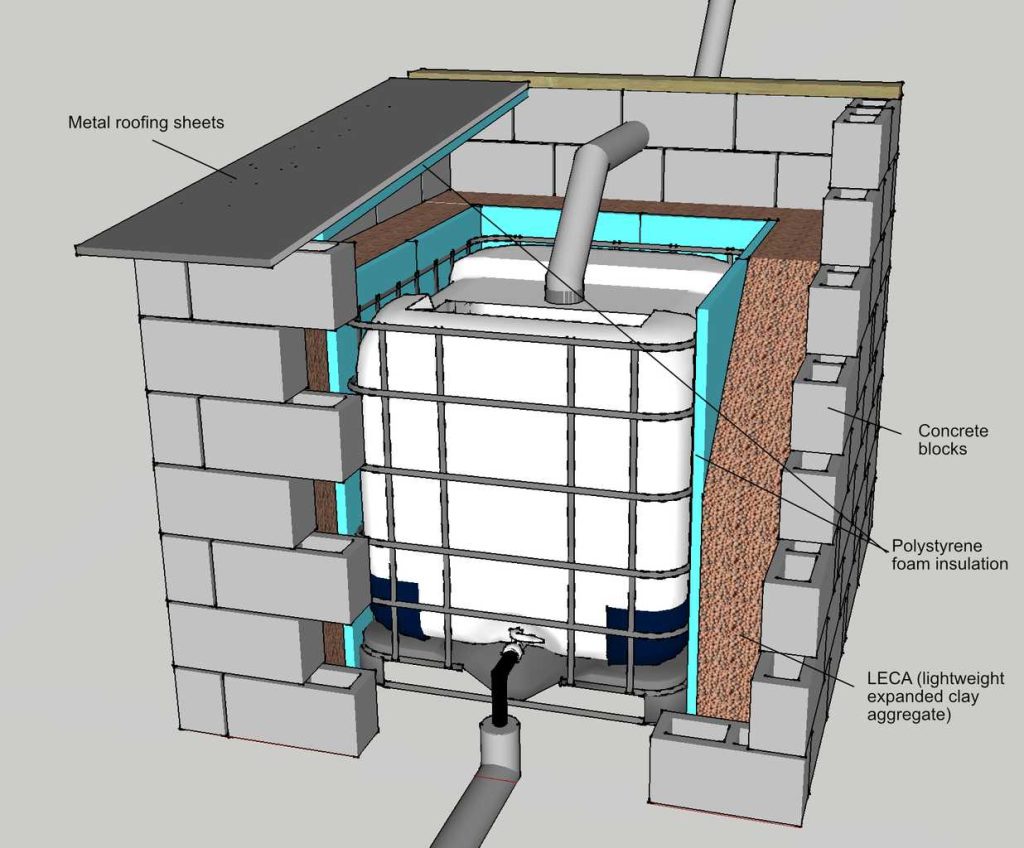
Insulated container
Earthworms survive within a temperature range of 5-29°C. Their optimum temperature range is 20–25°C. Cold is not as big an issue for them as heat – while their activity slows down a lot in winter, excessive heat can kill them instantly. To keep them as close as possible to their preferred temperature range, the IBC tank will need to be encased in an insulated housing in most climates.
You can make the housing out of a wide range of materials – brick or blockwork, stonework, bois, etc. It will need a hinged roof for access, also insulated.
Insulation can similarly be provided by a wide range of materials. You could even build the tank enclosure from straw bales and then lime plaster them. The possibilities are almost endless, but the enclosure must be capable of maintaining your worms between 5-29°C in your climate throughout the year. Worms also prefer the dark, so make sure the container is reasonably lightproof.
Pipework
Run the pipework to the tank in the standard size for toilet waste pipe in your country. Make sure you adhere to minimum drain slope guidelines for the diameter of pipe you’re using over horizontal runs to prevent clogging or solids getting left behind. The final drop into the tank can exceed these slopes.
Plumb the pipework in through the central access hole in the IBC tank. This is important. It ensures even distribution of wastes and helps the worms stay better insulated from external temperature fluctuations if they’re encouraged to congregate in the centre of the tank.
Tank drainage
Please note: this section has been amended to incorporate recent experiments and improvements in drainage.
The first versions of the system we experimented with had a very simple system of 2 mesh layers – coarse and fine – to prevent organic material potentially blocking the exit of the tank and compromising the easy drainage which is necessary to keep the ecosystem aerobic.
pourtant, some people were finding blockages were occurring above the exit tap at the bottom of the tank.
Dead leaves can stick together when they’re wet and form a mat across the tank if there’s enough of them in one place to form a layer. This can stop the water from draining through fast enough and will cause problems. While this situation is easily remedied by forking through the material in the tank and giving it a few days to recover without further additions, if the problem isn’t caught in time, it can create anaerobic conditions and possibly drown the worms.
As a result I developed the following drainage system which, after a 6-month trial, seems to be working well. It ensures water can drain regardless of where in the tank it could potentially get held up and it allows for easy flushing through should any material block the exit pipe.
If anyone develops alternative solutions, please let the community know via Discorde
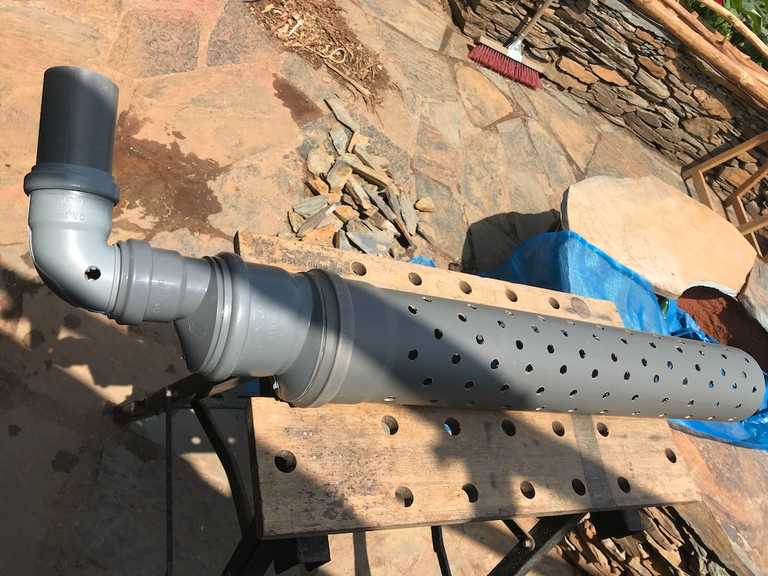
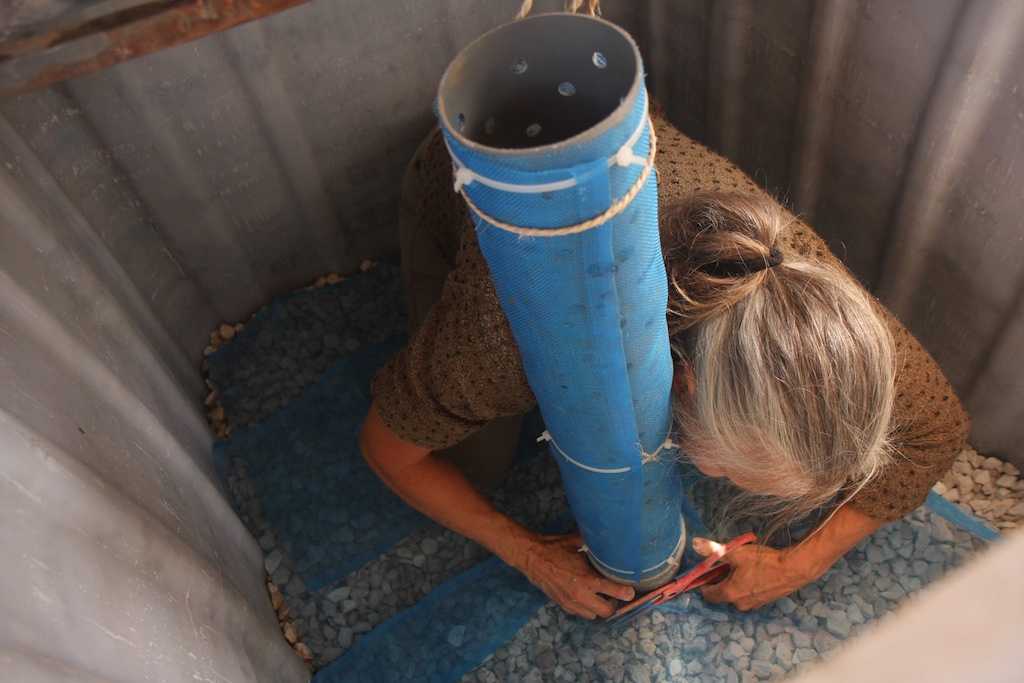
Assemblies of this system will look different depending on the PVC pipe available in different countries, but the principle is to construct a wide diameter perforated pipe a little less than the height of the tank – it must be higher than the depth of the organic layer – which then fits into the exit tap housing of the tank. I used 110mm diameter pipe stepped down with reducing fittings until it slotted into the exit of the tank.
A watertight fitting is not necessary – drainage potential needs to be maximised – and the assembly is held vertically in place by the organic material in the tank.
Once perforations are drilled into the pipe assembly, it’s covered with a fine nylon mesh to prevent organic material and worms from passing through. Don’t use metal – it will rust.
Be sure to drill drainage holes into the right-angled pipe fitting at the base of the assembly to help drainage at that level. Because this joint is in the gravel layer at the bottom of the tank, it doesn’t need to be covered by mesh.
Once the assembly is in place, the tank can be filled.
First, put in a coarse gravel layer to the depth of the exit pipe housing of the tank.
Cover this with a fine nylon mesh layer (the same gauge mesh as used to wrap the drainage pipe). This prevents all but the finest worm compost leaving the tank.
Now the organic material can be added – see next section.
Starting the ecosystem
Fill the tank 3/4 full with coarse organic material. Use a good mix of woody materials and make sure they’re well mixed up. The aim is to have a range of materials that decompose very slowly right through to reasonably fast. This ensures a steady supply of carbon for the ecosystem as well as providing a relatively stable matrix for the microorganisms to inhabit.
Coarse wood shavings and offcuts, chopped prunings, dead leaves, dead bracken, straw, etc, both dry and partly decomposed, make an ideal mix. (See the section on tank maintenance on the Function and maintenance page for more details.)
Keep green material to an absolute minimum. You don’t want to encourage too much thermophilic decomposition because the environment will become too hot for the worms.
Fine material like sawdust should pas be used. It’s too fine, and will clog the filters.
The materials need to be well mixed up. As mentioned in the preceding section, dead leaves can stick together when they’re wet and form a mat.
If the organic material is very dry, it will benefit from an initial thorough wetting to provide the optimal moisture level for the worms. Hose down the material evenly until water runs from the tank. This also acts as a test to make sure water is draining through properly, and fast enough to keep conditions in the tank nicely aerobic.
Once the organic material has been added, cover the surface with a small layer of any or all of partially finished compost, animal manure and kitchen scraps. The tank is now ready for worms. Partially finished compost is particularly good as it will contain many of the organisms your ecosystem will need.
Adding the worms
Worms can be sourced from any animal manure pile where they naturally congregate. (They may not be present in winter though or during droughts or periods of heavy rainfall.) They can be acquired mail order in many countries. The preferred species is Eisenia foetida, also known as redworm, brandling worm, panfish worm, trout worm, tiger worm, red wiggler worm, or red Californian earth worm.
The initial number of worms you’ll need depends on how many people will be using the system. UNE 2011 study conducted in India by Yadav et al (*) found that the optimal stocking density of worms for the fastest reproduction and growth rate was 0.5kg worms/m2 (1lb per square yard). Since the tank is 1m2 in cross-sectional area, you can therefore start the vermicomposting toilet system with as little as 0.5kg worms.
Yadav also found that for optimal food intake by worms, a feedstock rate between 0.40-0.45kg (roughly 1lb) feed per 1kg worms per day was best. On average, humans eliminate 128g (4-5oz) of fresh faeces per person per day, so you can calculate the initial number of worms you’ll need by allowing 0.5kg (1lb) for every 2 people using the system. These numbers should keep odours to a minimum while the ecosystem establishes and the worm population grows and adjusts to the feed rate. It’s not necessary to be too exacting about this. It’s a self-regulating ecosystem. In other words, the worms will adjust their population automatically to move in step with the availability of food.
If you’re able to allow the worms to adjust to their new environment for a month or so before using the system for the first time, you will minimise the likelihood of any slight smells during the settling in period. A layer of animal manure and kitchen scraps on the surface of the organic material will ensure the worms have plenty of food for this period.
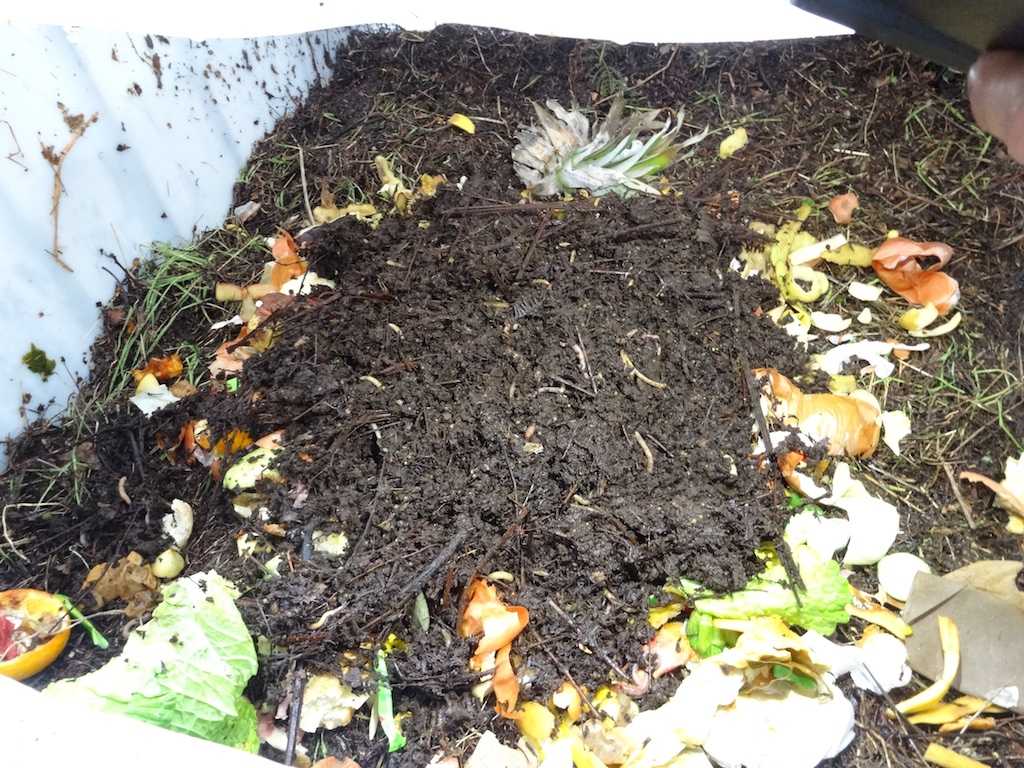
Worm tank newly prepared for use. It contains a mixture of softwood chippings and bark, straw and dry oak leaves, topped with scrapings from beneath Acacia trees, kitchen scraps and finally worms plus their compost from a working vermicomposting toilet system. This will be left for the worms to settle in for a week or so before starting to use the tank.
What’s the maximum number of people a single system can handle?
Given optimum conditions, adult worms can double their number within as little as one month and certainly within 2 months, so the population quickly adjusts to ideal levels and becomes self-regulating thereafter. Once established, the system can cope with larger numbers of users over the short term with ease and doesn’t need any intervention to do so.
With a density of 3kg worms/m2 – the maximum density Yadav et al found consistent with a healthy ecosystem – the system would theoretically be capable of handling the regular input of 12 people. pourtant, the maximum usage number of a single IBC-based vermicomposting system has yet to be determined in practice – to our knowledge, nobody has tested this yet. For this reason, we wouldn’t recommend a single tank system for households with a constant population of more than 4 people, unless several of them are away from the premises for a large part of the day and hence using other facilities.
Please bear in mind that since this is a living system, it will respond to changing seasons. Worm activity slows down a lot in winter and the colder your winters, the less activity there will be. This means that if your system is operating close to capacity in summer, in winter waste will start to accumulate and risk overwhelming the system. In this instance, it’s far better to install two tanks from the start and either split the waste flow or alternate between them.
* Vermicomposting of source-separated human faeces by Eisenia fetida: effect of stocking density on feed consumption rate, growth characteristics and vermicompost production. Yadav K D, Tare V, Ahammed M M. Waste Management, Volume 31, Issue 6, June 2011, Pages 1162–1168
The ‘greenfilter’ or soakaway
The vermifiltered water leaving the worm tank can be cleaned further in any of, or a series of, greenfilter beds, on-contour percolation trenches (swales) or mulch pits, sized according to the volume of water passing through the tank.
If grey water is being processed through the tank as well as black water, the ‘greenfilter’ needs to be several times larger than it would be for black water alone.
Sizing the ‘greenfilter’
Greenfilter beds, percolation trenches and mulch pits fed by a vermicomposting toilet are filled with the same organic material as is used in the worm tank. This encourages the development of the same ecosystem within a loose-textured, well-aerated matrix, so similar rapid percolation rates can be expected within the organic layer of the greenfilter as are seen in the worm tank.
Filling a ‘greenfilter’ bed with softwood bark and chippings, dry oak leaves and straw before laying pipework at Quinta dos Covōes
Worm eggs will pass out of the tank in the vermifiltered water to colonise the greenfilter areas. While permitting rapid percolation, the organic material will also act as a sponge to hold water for uptake by plants and will serve to improve the texture, fertility and water retention capacity of the surrounding soil as well as forming the principal substrate for a massive increase in the soil biota present. This results in cleaner water with fertility, moisture and fungal communication pathways for the vegetation. It will also lead to improved percolation rates through the surrounding soil as it too is colonised by worms, improving texture and aeration. Earthworms are able to increase the hydraulic conductivity and natural aeration of soil not just through the physical action of burrowing, but by granulating the clay particles which pass through their bodies.
This is a whole different equation to working with an essentially inorganic filtration concept. As with the worm tank, it’s a self-regulating living system.
Pipework
Run pipework from the worm tank to a distribution box in the greenfilter area(s) in the same diameter or greater than the tank drain tap. From the distribution box, run smaller diameter perforated pipe through the uppermost 20cm of the organic material. Wrap the perforated pipes in geotextile filter fabric or horticultural fleece to prevent blocking by the organic material.
For on-contour percolation trenches or swales, the perforated pipework should also be laid on contour.
Mulch pits don’t require perforated pipework. Small diameter waste pipes fed from the distribution box are sufficient.
Greenfilter areas serve best to irrigate trees and shrubs, and can include edible species.
Further Reading
Grey Water Central, Oasis Design.
Create an Oasis with Grey Water, Art Ludwig.
Picture and material source: http://www.vermicompostingtoilets.net/design-construction/
This Projectpage/work is licensed under a Creative Commons Attribution-NonCommercial-ShareAlike 4.0 International License.